
JRHome: Building a Home Platform That Only Shows What It Knows
JRHome didn’t start as a platform.
It started the way a lot of smart-home projects do: a Raspberry Pi, a few devices that didn’t quite talk to each other, and the dangerous realization that I could probably make the whole thing work better.
The house already had plenty of my own projects in it: ESP32 lighting nodes in the Craft Cove, a bench node with its own little touchscreen, a 4.3-inch workshop “command center,” and a custom garage-door controller. Every one of them worked. None of them knew the others existed.
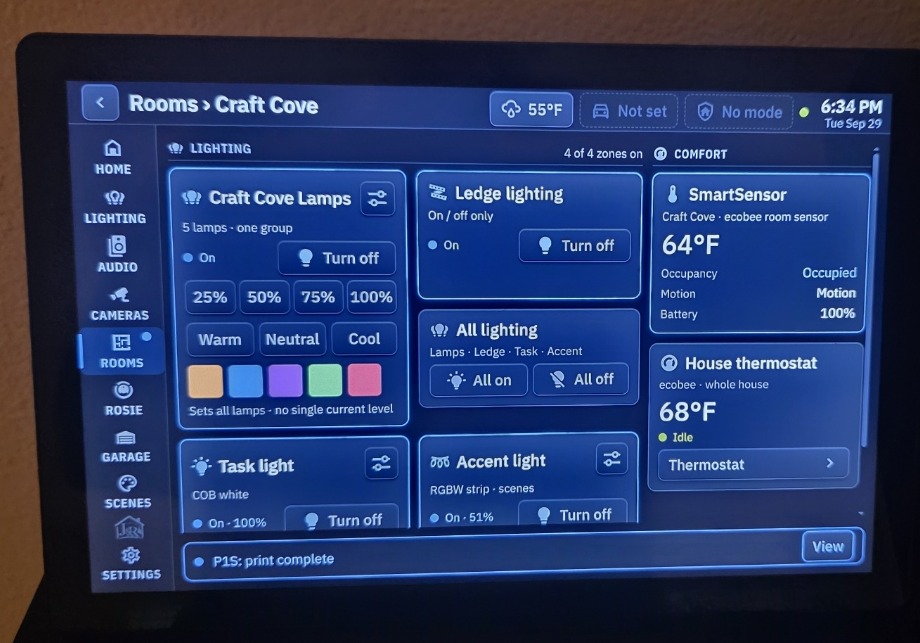
Today Home Assistant sits at the center on a dedicated Raspberry Pi 5, with a custom 10.1-inch touchscreen in front of it, designed like a small product rather than a page of dashboard cards. Around it are ESP32 field controllers, room displays, and integrations for the Ring cameras, lighting, the thermostat, Rosie the robot vacuum, the 3D printer, weather and commute traffic. Behind it all are the backups and release history that let me undo my own mistakes.
One rule ties it together:
If the system can’t prove something, it doesn’t pretend to know it.
If Home Assistant can’t confirm a light is on, the panel doesn’t say it’s on. Nothing measures whether the garage door is open, so the panel says exactly that instead of guessing. A tap sends a command, and the tile changes only when the real device reports back. That sounds obvious. It turned out to be the hardest rule in the project to keep, and most of the bugs below are the system finding creative new ways to break it.
At a Glance
| Core | Home Assistant OS on a Raspberry Pi 5, wired, booting from an NVMe SSD |
| Main interface | JRHome Control: a custom kiosk application on its own Raspberry Pi 5, behind a 10.1-inch 1920×1200 touch display |
| Satellites | An Elecrow 5-inch ESP32-S3 panel (ESPHome + LVGL), a Bathroom Health display on an ESP32 “Cheap Yellow Display” board, and 4.3-inch Craft Cove and Utility panels, all in service |
| Field hardware | A custom ESP32-C3 garage controller and the Craft Cove task/accent lighting nodes, all in service; a first Christmas lighting node built and working on the bench; a couple more ESP32 nodes still being brought online |
| Major integrations | Ring cameras and doorbell, Alexa devices, an ecobee thermostat, Tuya and Govee lighting, an LG soundbar, a Bambu Lab P1S printer, Rosie (an iRobot Roomba 575 Combo), weather, commute traffic |
| Current status | In daily use. Some pieces are still in development or planned, and I’ll say which as we go. |
| Skill level | Advanced: Home Assistant, Raspberry Pi, ESP32 firmware, some web development |
What JRHome Actually Is
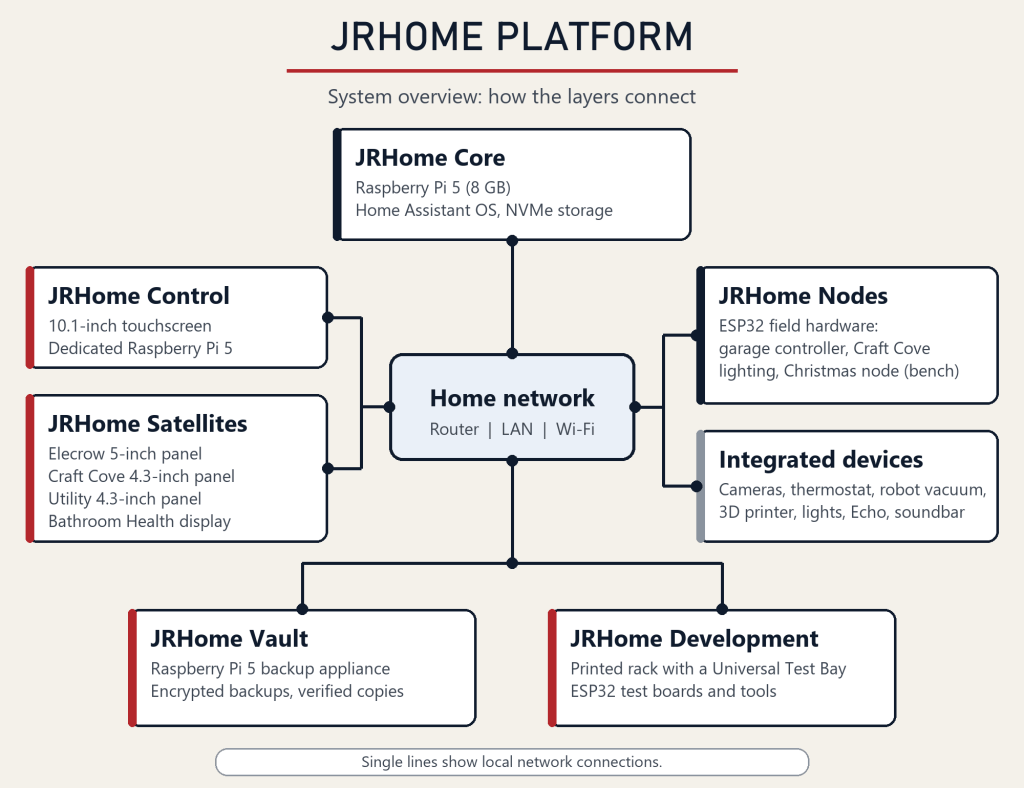
JRHome isn’t a Home Assistant dashboard. Home Assistant is one layer of it. The system has distinct parts, and I keep their names separate on purpose:
- JRHome Platform is the whole ecosystem.
- JRHome Core is Home Assistant and everything behind it: integrations, automations, the state of the house.
- JRHome Control is the main 10.1-inch touchscreen application, the thing you actually walk up to.
- JRHome Satellites are smaller displays for one room or one job.
- JRHome Nodes are the ESP32 and other field hardware that switches, senses or talks to real equipment.
- JRHome Vault is backups, recovery, release history and the archive.
- JRHome Development is where changes get built and proven before they touch the house. It’s the newest name on the list, and I’m still formalizing it.
Three rules hold the layers together. Home Assistant is the source of truth: Control and every Satellite read and command through Core, and no screen talks directly to a cloud service or a node. Nodes stay independent: a field controller keeps its own local job, and Core only asks it to act. Interfaces hold no device credentials.
New things get classified by their job, not their hardware. If it switches or senses equipment, it’s a Node, even if it has a screen. If it shows and commands one room, it’s a Satellite. The visual brand is an identity layer on top and never changes how the system works.
Why I Built It
The problem wasn’t a lack of smart stuff. It was too many separate systems, each doing its own thing, with nothing tying them together.
I wanted a supervisory layer: one place that sees everything and can command most of it, without taking anything away from the devices underneath. From the first project note, existing controllers keep their own local, real-time job, and Home Assistant sits above them for dashboards, automation and coordination. If Home Assistant goes down, nothing should get worse at the device level.
The second goal mattered just as much: a permanent, family-oriented touchscreen that the rest of the household would actually use, not a wall of toggles only I could decode. That meant treating it like a product.
From Smart Devices to a Platform
On Day 1, JRHome was a Raspberry Pi, one smart socket and a written checklist. That checklist included a “do not install yet” list: MQTT, ESPHome, HACS, Alexa, custom dashboards, cameras and storage upgrades all waited until the base system was stable, then arrived one at a time.
Then reality started correcting my plans. I’d drawn the 10.1-inch screen as a technical service display for me; it became the main family interface. I’d drawn the 4.3-inch workshop panels as the brains of their rooms; they’re really displays reading their nodes, and a display shouldn’t be anybody’s brain. I’d written down that the garage controller ran ESPHome; it actually runs custom Arduino firmware with its own small web API.
About a week in, I stopped and reconciled it all: archived the old documents untouched, redrew the as-built diagrams, and adopted the vocabulary above. The names didn’t come first. They came from noticing the old ones were wrong.
In roughly two weeks the system went from a brand-new Home Assistant Core to a live main Control panel, room displays, custom integrations and the beginnings of a repeatable Satellite standard, plus one forced storage migration.
JRHome Core
JRHome Core is Home Assistant OS on a wired Raspberry Pi 5 with 8 GB of RAM. It’s a server and nothing else; the touchscreen runs on a separate Pi.
Day 1 was deliberate: a reboot test, a verified baseline backup, and exactly one low-risk first integration — an existing smart socket on the Craft Cove ledge lighting — before anything else touched the system. It wasn’t without drama even so: the kit’s original microSD card flashed and verified fine, then failed during commissioning. I swapped in a new card and kept the dead one, labelled, so it could never sneak back into service.
Storage came back for a second round later in the project, and that round taught me more.
Core started failing the way a corrupted card does, with SD timeouts and read errors. I’d already lost one card, so “another dead card” was the obvious theory. Then a separate test card failed the same way in that Pi, while the Pi’s bootloader and HDMI output kept working. When a second card fails the same way in the same reader, the card stops looking like the real culprit. The failure followed the Pi’s onboard SD path. The production card later turned out to be usable outside that boot path and has since been reformatted for reuse. I can’t prove the card was entirely innocent, but the evidence points at the reader, not the card.
NVMe had always been the long-term plan for Core; I’d just assumed I’d migrate on my own schedule. The failure forced the move right then. I put a fresh Home Assistant OS install on a roughly 256 GB NVMe SSD, restored a recent Home Assistant backup onto it, and Core came back. The major integrations reconnected (Tuya needed a re-login), and I walked the whole panel afterward to make sure it was telling the truth: garage control, the cameras, lighting, the thermostat, the printer, Rosie, weather and the Bathroom Health Satellite all came back and checked out. The one holdout was traffic, which stayed down until a Home Assistant update fixed it.
Two lessons. A production head end shouldn’t depend on a microSD boot path when NVMe is available and already planned; I should have moved Core before it had the chance to fail. And a backup is far more convincing once it has actually restored production. A week earlier I’d written in my own recovery notes that “a backup that has never been restored is a hope, not a backup.” This one stopped being a hope.
Core has grown one integration at a time since Day 1. The Govee lights needed an extra piece: my network doesn’t pass the multicast traffic Govee’s local discovery relies on, so they reach Home Assistant through a bridge and a Mosquitto MQTT broker on Core. That broker later carried the first purpose-built Satellite, and it stars in one of the better bug stories below.
JRHome Control
JRHome Control is the main touchscreen application. It runs on its own Raspberry Pi 5 behind a 10.1-inch, 1920×1200 IPS touch display, in a Chromium kiosk. I locked that hardware early so I’d be designing for a real screen, not an imaginary one. Control is a client of Home Assistant, never a host: the panel can crash, get unplugged or take a new release, and the server stays untouched.
The first real lesson was pixel density. My own spec said “design at 1920×1200.” On a 10.1-inch panel that’s about 224 pixels per inch, so a literal layout would have produced touch targets around 5 mm wide and text you’d need to squint at. Instead, the interface is laid out in CSS pixels with a per-device scale factor. The real panel runs at a scale of 2.0, and the same components will come out the same physical size on a larger screen later.
The design rules I locked early:
- Color means state, and only state. Steel blue is active, olive is healthy, amber needs attention, burgundy is a fault, graphite is idle. Normal is quiet; exceptions are loud.
- One source of truth. A single design-token file generates the CSS, the contrast report and the spec tables, so the documents can’t drift from the code. Fonts and icons are served locally, so the interface has no internet dependency.
- Fixed geometry. Events change a card’s state, never the layout. A doorbell ring doesn’t reshuffle the screen under your finger.
- Capability gating. A control only appears once Home Assistant has proven that capability exists on this device. Anything unproven shows an honest “Not commissioned,” or doesn’t appear at all.
Capability gating is the “only shows what it knows” rule turned into code. I designed the printer page before I had real data, every value marked as simulated, then ran a read-only discovery during an actual print. The evidence corrected me: no chamber temperature, no AMS fault signal, and untagged spools report remaining filament as “unknown.” The “AMS jam” screen I’d drawn became a general printer-error screen, and remaining filament shows nothing rather than a guess. Because the interface was capability-gated, that was a policy edit, not a redesign. It’s the same reason I ran discovery against the real Home Assistant before building the interactive prototype.
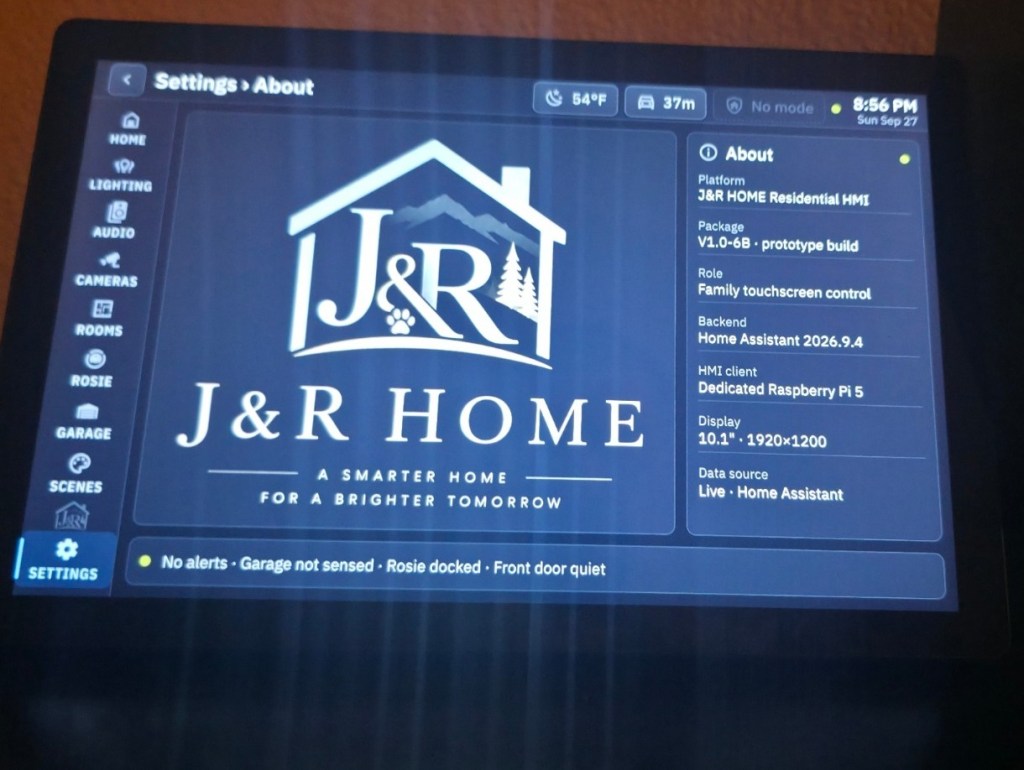
Under the interface sits a small local runtime on the Control Pi. It proxies Home Assistant, relays video signaling for the cameras, and holds the panel’s one Home Assistant token, which stays on the Pi and never reaches the web page. It also enforces command groups: each family of commands (Rosie, the soundbar, Alexa, the printer, Tuya, Govee, the garage, the thermostat) is off until I deliberately switch it on. All eight are on today.
Releases are versioned packages with a known-good marker and one-command rollback. Before a release reaches the real panel, it goes through automated self-tests, layout audits, interaction tests and mutation checks. The first time I ran the layout audit across hundreds of layout combinations, it found 9 overflows and 23 truncated labels that a handful of screenshots had politely hidden. Mutation testing is the part I’d recommend to anyone: I deliberately break the code and confirm the tests catch it. A test that has never failed hasn’t proven much.
Then the release goes on the real panel, and this is the rule I care about most: the physical screen gets the final vote. A release only becomes known-good after I’ve used it on the actual hardware and accepted it. That isn’t ceremony: the idle screen in the bugs section passed every automated check and then showed a black screen on the real panel. Sound followed the same rule. The panel’s audio cues are synthesized in software, and they didn’t count until they’d been heard on the real unit. They have been, and the Sound page is now commissioned.
The design also expects to grow. An 18.5-inch common-area display is planned to run the same application. The layout is already built and tested for that size; the hardware hasn’t been chosen or bought.
JRHome Satellites
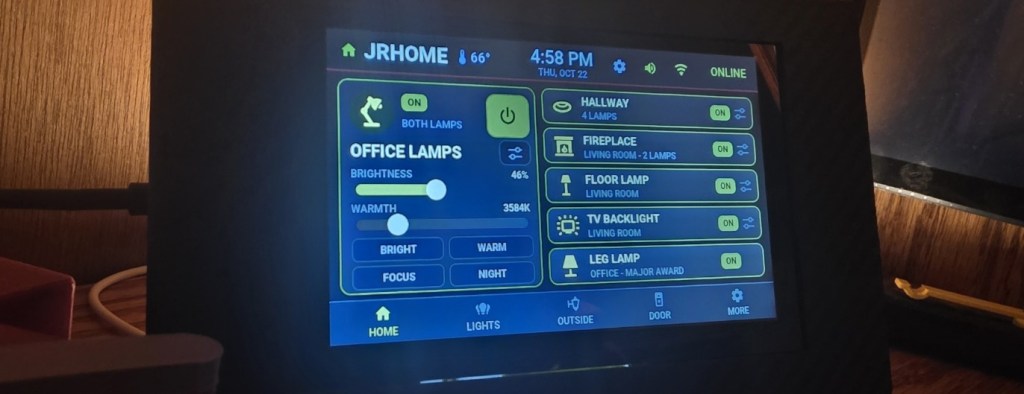
The first JRHome display was actually the small one: an Elecrow 5-inch ESP32-S3 panel running ESPHome and native LVGL, talking to Home Assistant directly with no MQTT in the mix. It went from a bare board to switching a real receptacle, in sync in both directions, the same day Core came up — then grew into a full lighting dashboard a couple of days later.
Its rule is the same as everything else: a tap only sends a command, and the tile waits for Home Assistant to say otherwise. It’s a Satellite-class display built before I’d even written the Satellite standard, and it’s still earning its keep every day.
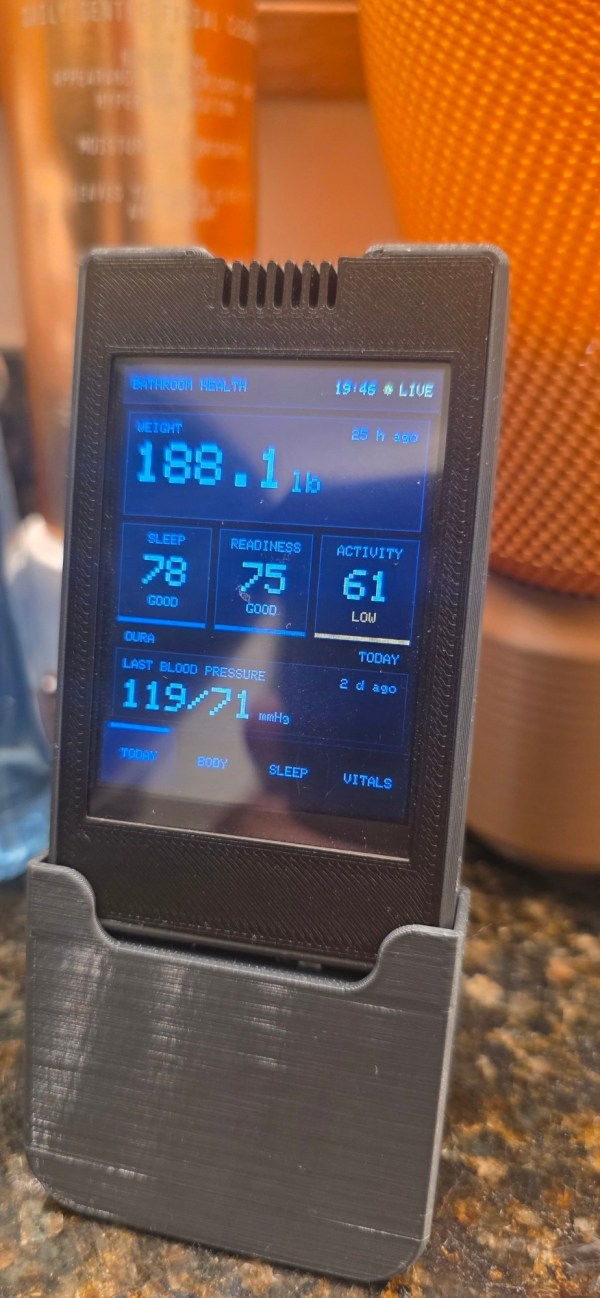
The second Satellite is the first one built to a deliberate standard: a small Bathroom Health Satellite on an ESP32 “Cheap Yellow Display” board (240×320, portrait, resistive touch). It’s a glanceable display for health data the household already collects with its own devices and apps. I’m not going into the data. The architecture is the interesting part:
- Core prepares, the Satellite presents. A Home Assistant automation normalizes the source data into one small “view” message and publishes it over MQTT. The display only parses that view and draws it.
- Vendor protocols stay upstream. Device-specific Bluetooth and app integrations belong to providers on the Core side. The display’s own Bluetooth is off, and it accepts no remote commands.
- Every value carries its provenance. Each panel shows as LIVE, STALE, MOCK, UNAVAILABLE, NOT SET UP or NO DATA. A value only counts as LIVE if its source timestamp is proven fresh by the device’s own clock, and demo data never quietly fills a gap.
- Credentials live only on the device, entered once over USB, never in Git or a firmware file.
The Bathroom Health Satellite is fully operational, with live blood-pressure, Oura and weight data delivered through JRHome Core.
The reusable part of that firmware has become a shared JRHome Satellite runtime: identity, networking, OTA updates, a setup console, the freshness rules and the screen frame. The next Satellites start from it instead of from scratch.
It was also the first project under a rule I call “autonomous at the edge, controlled at the core.” Inside a qualified Satellite, firmware, flashing, UI and OTA work moves fast without stopping for approval at every routine step. Core, the network, the MQTT broker, JRHome Control and every other node are a hard boundary: anything touching them waits for me, and physical acceptance is always mine.
Two more Satellites on 4.3-inch panels
The next two Satellites came quickly. Both use the same 4.3-inch Elecrow panel hardware, and both are built the way the 5-inch one is: ESPHome, Home Assistant only, and the same rule that a tap sends a command and the tile waits for Home Assistant to confirm it.
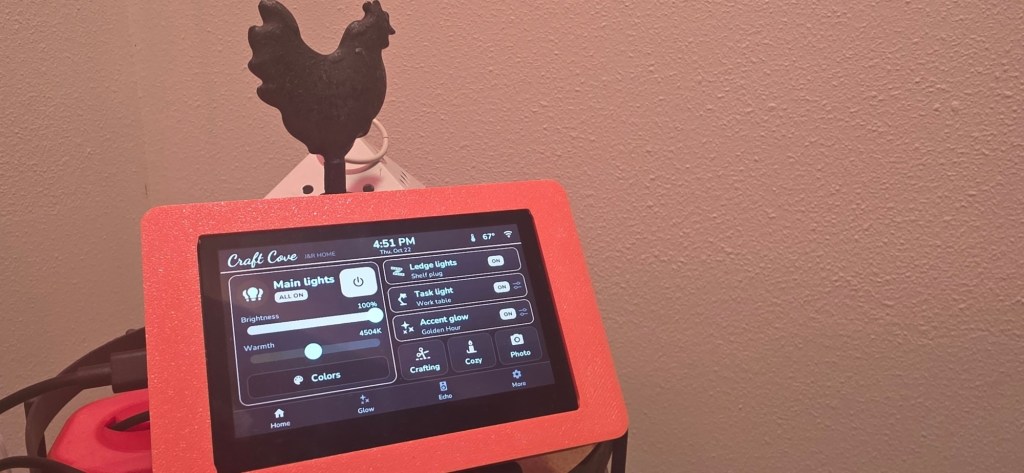
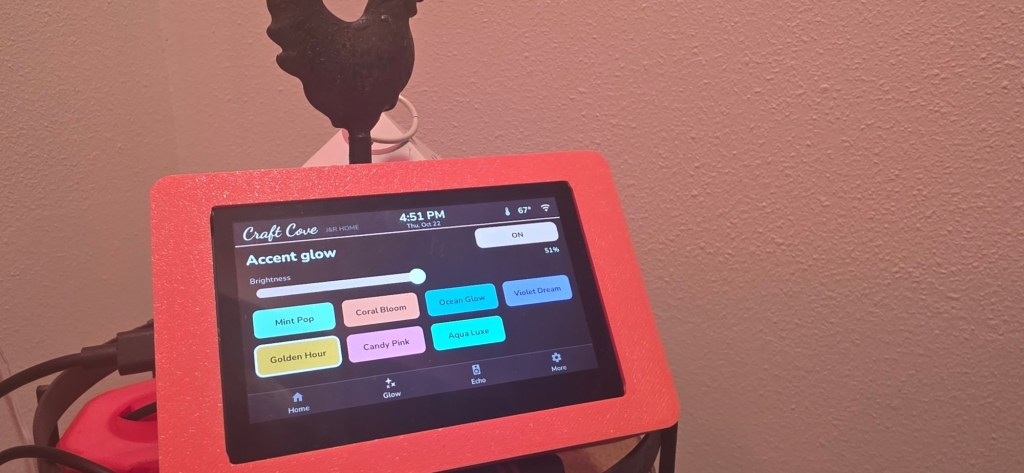
The Craft Cove Satellite lives in the craft room. It wears a warmer palette than the rest of JRHome, with the room’s name in script lettering, but the state colors mean the same things. The home page treats the five main lamps as one card, with power, brightness, warmth and a color picker, and gives the ledge lights, the task light and the accent glow a row each. Three scenes sit underneath: Crafting, Cozy and Photo. An Echo page handles the room’s volume and mute. If the panel is off, nothing breaks: every light still works from Home Assistant, the 10.1-inch panel and its own switches.
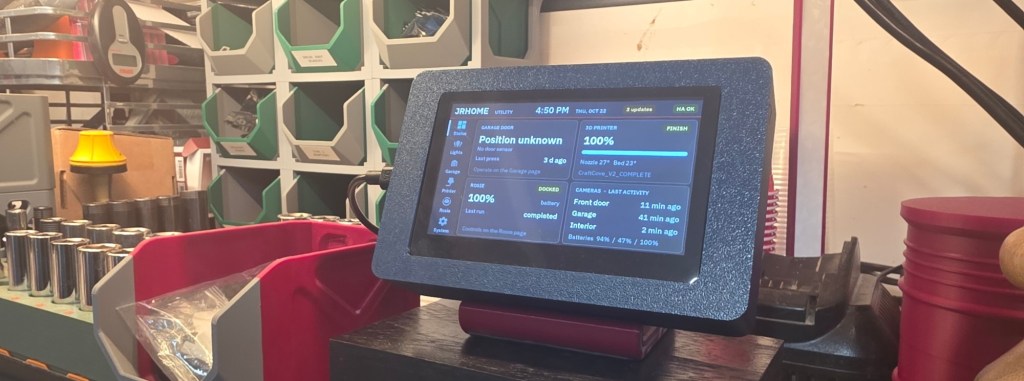
The Utility Satellite is my utility panel for the garage side of the house. A rail down the left side takes you to Status, Lights, Garage, Printer, Rosie and System. Status is a read-only overview of the garage, the 3D printer, Rosie and the cameras’ last activity and batteries. Lights gives eight one-tap tiles plus a “hold: indoor lights off” button that leaves the porch lights alone. Printer and Rosie have their own pages, and System shows Home Assistant’s link, the last automatic backup and any updates waiting.
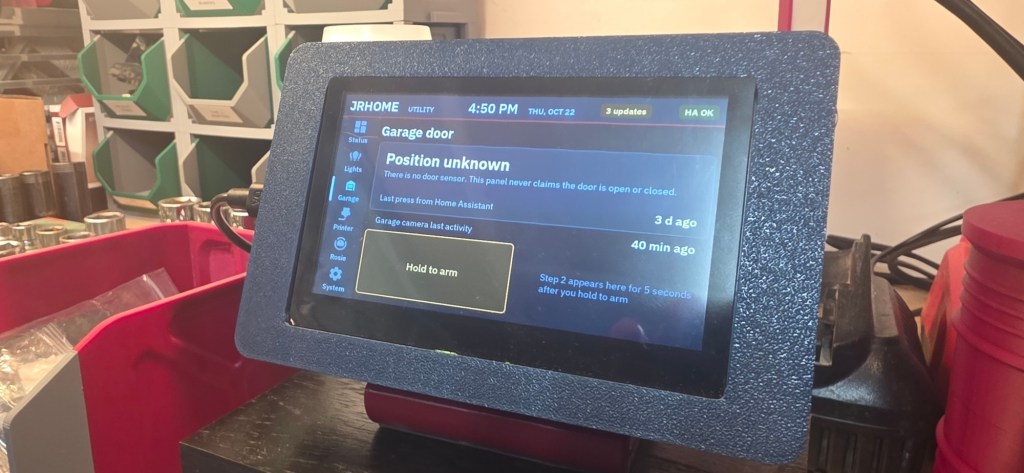
The Garage page is the one I care about most. It says “Position unknown” in big letters, because there’s no door sensor, and it never claims the door is open or closed. Operating the door takes two deliberate steps: hold a button to arm it, and a second button appears for five seconds. Press it once and the panel sends a single command, then locks itself out for five more seconds.
JRHome Nodes
The garage controller is in service: an ESP32-C3 SuperMini running custom Arduino firmware with its own local web API. It owns the relay pulse and its own lockout. The door opener’s own safety systems remain the safety systems; the touchscreen’s confirmation step is a convenience, not a safety device. Core reaches the controller through a Home Assistant button that calls a REST command, and that’s as much authority as Core gets.
What the controller doesn’t have is working door-position sensing; its position sensors are disabled. So the panel never claims the door is open or closed. It says “Position unavailable / Sensors not commissioned,” every time, because that’s the truth. Reed switches are planned, and until they’re in and proven, the panel keeps saying it doesn’t know. My first garage design assumed a generic “cover” with open, closed and obstruction states. The real controller has one toggle and no position sensing, a good argument for reading the real device’s API before designing its buttons.
The rest of the Nodes are at different stages:
- The bench node, a CYD-based bench-diagnostic node: identity verified, full flash backed up, and an ESPHome replacement designed and fully compiled. It has never been flashed. It’s parked, not abandoned.
- The Craft Cove custom lighting is in service: a custom ESP32-family Node drives the 24V COB task lighting through a MOSFET switch, and a second ESP32-family Node drives the RGBW accent strip. Both are integrated through Core and show up on the Craft Cove room page alongside the off-the-shelf Govee group.
- A workshop lighting node turned out to be an Arduino Mega on a wired serial link, not an ESP32, so “migrating” it really means swapping hardware.
- The first Christmas lighting Node is built and working on the bench: a WLED controller driving 24 V pixel lights, in Home Assistant, on a schedule, with dozens of looks to choose from. It isn’t installed outdoors yet.
- Planned: Matter/Zigbee devices and an outdoor-kitchen/BBQ controller.
What JRHome Does Today
Most of the day-to-day happens on the 10.1-inch panel:
- Garage. Hold to operate, and the garage camera goes live for about 75 seconds afterward so I can see what happened — the camera is for my eyes, not a position sensor.
- Cameras. Live Ring video on demand, signaled through Home Assistant, one camera at a time, closed when you leave the page.
- Lighting. Toggles for the Craft Cove lights — the custom task and accent nodes alongside the five-bulb Govee group — a kitchen-entry bulb, and two living-room lights, plus a Details view for brightness, color and effects — only for devices that actually support them.
- Thermostat. The ecobee: live readings, room sensors, and fan, mode, setpoint and comfort-setting changes from a detail view.
- Printer. The Bambu P1S’s job progress, temperatures, AMS filament trays, a camera snapshot, the chamber light and the speed profile. It shows up on the Home page only while it’s printing or needs attention. Pause, resume and stop are deliberately not on the panel.
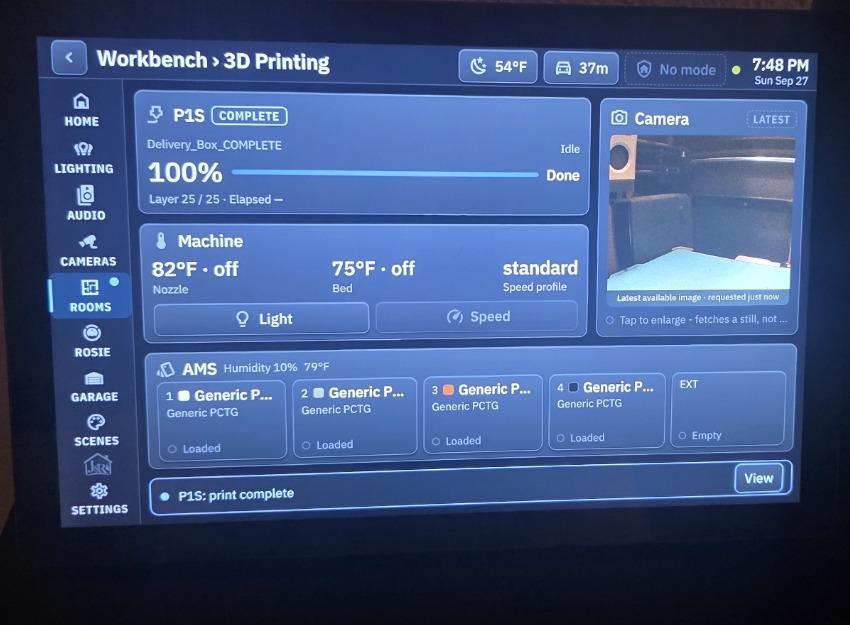
- Rosie. Our robot vacuum, an iRobot Roomba 575 Combo: status, plus pause, resume and dock, checked against the vendor’s own app.
- Audio. Whole-house audio and the home theater on one page, in two tabs. The Echo Show displays get volume, mute, and Pause, Resume and Next; the Echo speakers get volume only; the LG soundbar gets power, input and sound mode, volume and four presets. The panel says “awaiting confirmation” until Home Assistant reports back, and never claims something is playing unless Home Assistant confirms it.
- Weather and traffic. A weather chip with a forecast overlay, plus drive times for two commute routes, both working as expected. If either goes quiet, the panel says so rather than quietly going stale.
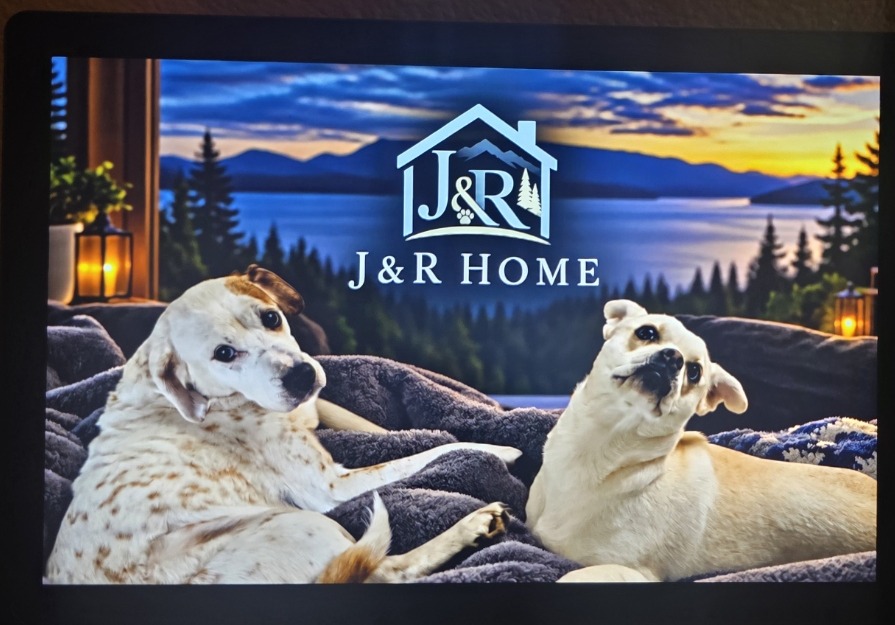
- Idle screen. After five minutes, a custom, personalized idle screen. The first touch only wakes the panel; it never presses whatever was underneath. If Home Assistant is unreachable, the idle screen stays out of the way, so a real fault is never hidden behind nice artwork.
Audio is the newest page, and it has changed a lot over the last few days. The Whole-Home tab covers the Echo devices around the house: the Echo Show displays get volume in ten steps, mute, and Pause, Resume and Next, while the Echo speakers get volume only and say “Not confirmed” until Home Assistant reports back. The Theater tab handles the home theater: the soundbar’s power, input and sound mode, its volume, and four presets (TV, Movie, Night and Music) that each set a sound mode and a level. It’s a good baseline, and I’m still working on it.
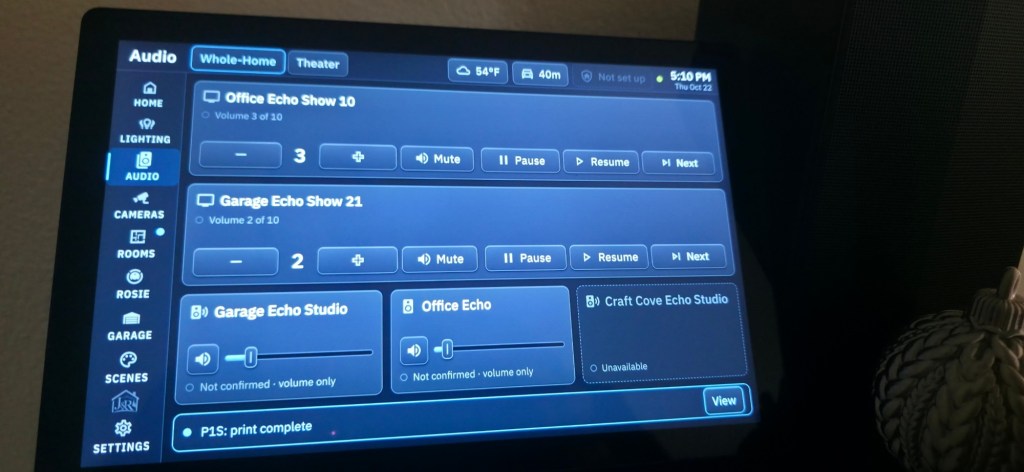
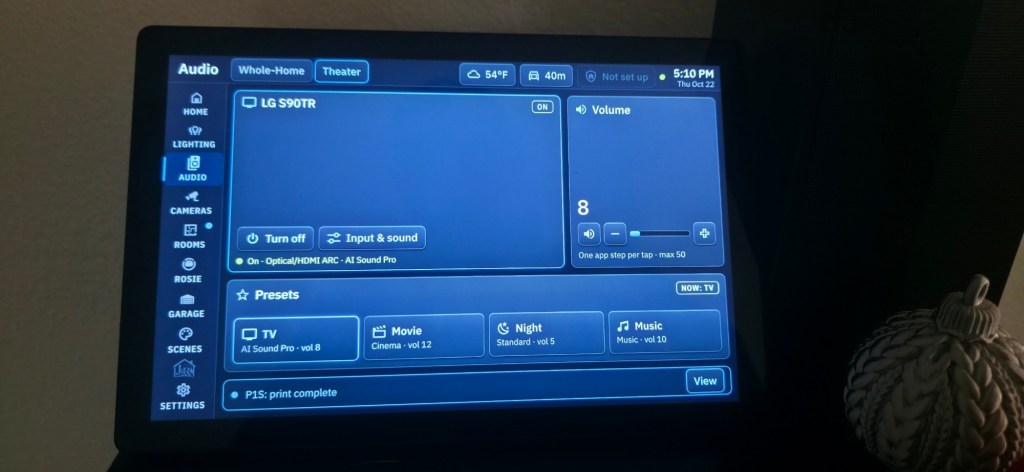
It isn’t perfect, and it says so. Pause, Resume and Next work by sending Alexa the same words you’d say out loud, and the panel can’t show what’s playing, because Alexa’s integration doesn’t report it. The panel’s volume number is only what Home Assistant reports, so it isn’t proof of what the speaker is doing, and the panel waits for confirmation rather than assuming. The front-door camera’s still snapshot is intermittently unreliable upstream, though live video is fine. If the link to Core drops, values are designed to turn into a dash and commands get refused, rather than freezing and looking live. So far that’s proven in simulation, not in a real outage.
The Bugs That Made JRHome Better
Almost every real bug in JRHome turned out to be the same bug wearing different clothes: the system confidently showing something it didn’t actually know. Here are the ones that taught me the most.
The address that was right everywhere except where it mattered. My new printer’s reserved network address collided with a static address hard-coded into an older bench device’s firmware. I caught that by reading the current source instead of old notes, and fixed it at the router. A few days later, every printer entity in Home Assistant went unavailable. Ping and port tests against the correct address all passed, which looked like proof the network was fine. They were answering the wrong question. The printer integration had kept its own stored copy of the old address, and only the integration’s diagnostics export showed it. An address migration isn’t done when the device and the router agree; everything that saved its own copy needs checking too.
“Idle” is not the same as “I can’t tell.” The panel showed the printer as a calm “Idle” while Home Assistant reported it unavailable: an unrecognized status value was falling through to a default. Once I went looking, I found the pattern twice more. The soundbar showed “Off” for both confirmed-off and unreadable, and Rosie’s bin showed “Missing” when the sensor simply couldn’t be read. All of them now say “Not confirmed” when they don’t know.
A COM port is not a name tag. I once read an ESP32’s flash believing it was the bench node. It was the 5-inch panel, still plugged into the same port from earlier work. Nothing was written, so nothing broke, and I quarantined that backup rather than deleting it. Since then, every flash read or write starts by checking the chip’s MAC address against a register of known devices. The Satellite commissioning tool goes further and refuses outright to flash a board whose MAC doesn’t match.
The computer said everything was fine. The screen disagreed. The screen won. The Elecrow panel’s first ESPHome build had working graphics and zero touch response, while a schema check passed the whole time. Trying the touch controller’s alternate address made things worse. The real fix was the manufacturer’s documented reset sequence for that hardware revision, run through the board’s I/O expander at boot. The same panel taught me not to trust a quiet log, too. State feedback looked broken until I realized the per-change logging was at a level I wasn’t watching. The screen had been right all along.
The broker was gone. I had removed it myself. That was educational. Partway through commissioning, every Govee light went unavailable at once. My first theory, that the bridge just hadn’t reconnected, was close but wrong. I had accidentally uninstalled the MQTT broker add-on through a Home Assistant repair dialog whose button did a lot more than I thought, and I caught myself about to do the same to another add-on. Separately, the bridge add-on’s container image had been corrupted. I reinstalled both with their configuration restored, and confirmed recovery from the lights’ actual activity history, not a busy-looking log. Read what a “Submit” button actually does.
Live video that negotiated perfectly and showed nothing. Home Assistant and Ring answered every live-view request in about half a second, and the panel still showed no video. So I shipped a diagnostic-only build that recorded every stage on the real hardware. The trace showed Chromium rejecting Ring’s answer: my offer included a data-channel line that Ring’s answer didn’t. The fix was one condition, creating the data channel only when Home Assistant’s client configuration asks for one. Live video worked on the panel that evening.
A black screen, then a blinking one. The first idle-screen release showed a near-black screen on the real panel, even though every automated check had passed. The build’s asset allowlist didn’t include the new artwork folder, so the image returned a 404 in production and the dark fallback background was all that rendered. The next release showed the artwork but blinked every few seconds: the interface rebuilds its overlay on every Home Assistant poll, and a one-time CSS fade-in was restarting each time. I removed the fade and added permanent checks for the missing-asset case. The third release was the one I accepted. A passing headless test isn’t a passing panel.
The card that wasn’t (provably) the problem. The Core section tells this one. The short version: one card really did die on Day 1, so “another dead card” was the obvious answer the second time, until a second card failed the same way in the same reader. Test the path, not just the part.
One more, smaller but sneaky: my first count of Alexa devices came up short because I’d filtered by name. Inventory by structure, not by the names you expect to find.
Vault and Development
JRHome Vault: how I get back

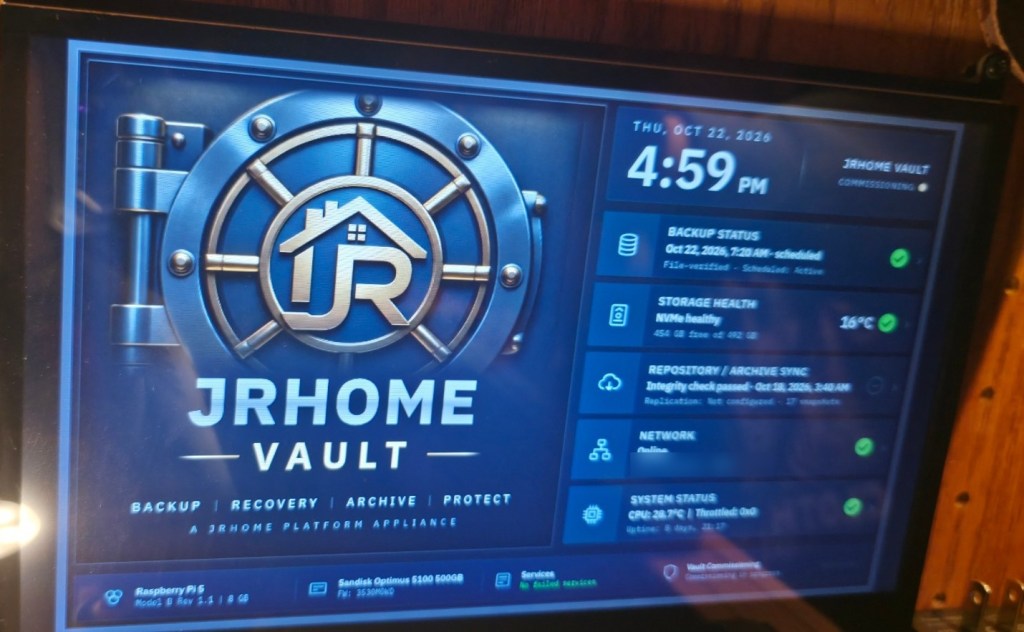
The Vault is a Raspberry Pi 5 with one job: to survive a bad day. It isn’t a second Home Assistant, and it isn’t a general-purpose file server. If Core fails, everything I’d need to rebuild the platform, such as backups, configurations, firmware and accepted releases, has to survive independently.
It exists because of the Core failure. The Pi with the unreliable SD reader got a second life: the same board, in a new case with a 500 GB NVMe drive, where the faulty SD slot is simply never used. That failure taught me that ordinary Home Assistant backups were necessary but not enough, and that recoverability should be built in rather than improvised afterward.
The hardware is a Pi 5 (8 GB) in an Argon NEO 5 M.2 case, booting from a SanDisk 500 GB NVMe and running Raspberry Pi OS Lite on wired Ethernet. I administer it over key-authenticated SSH behind a firewall, and it has no cloud remote access. In a ten-minute load test the Pi peaked at about 63°C and the NVMe at about 30°C, with no throttling or undervoltage.
Home Assistant makes its own backups and writes them to a restricted share on the Vault. The Vault pulls each file into an encrypted repository, restores a copy into an isolated spot and checks it against a checksum, so a backup only counts as a recovery point once it’s been proven readable. Scheduled jobs keep the status screen honest.
The screen is custom. It shows the latest verified backup, storage health, repository integrity, and network and system status, with healthy, caution, fault, stale and unknown states clearly different. The Vault runs fine without it, so a dead or missing monitor can never stop a backup.
Where it stands: the Vault is active today. Its hardware, operating system, display and scheduled backup pipeline have all passed acceptance, and it’s pulling Home Assistant’s backups and keeping known-good versions of what it protects (not every device family is in the archive yet). Final sign-off is pending the remaining expansion: secondary storage and the final mass-storage NVMe, both coming soon. Right now the backups sit on the same drive as the operating system, which is exactly what that expansion fixes. After that come an encrypted off-site copy, a UPS, a roomier case, a full restore drill (proving a backup file is readable isn’t the same as rebuilding a running Home Assistant from it) and the retention rules, which are installed but only in a dry-run mode.
The habits around the Vault are already real: Home Assistant automatic backups since Day 1; versioned Control releases with a known-good marker and one-command rollback; dated, untouched snapshots of superseded architecture documents, plus hash manifests showing exactly what changed since the last known-good state; and a real backup restore that returned Core to service.
Still planned beyond the Vault itself: a golden image for the Control Pi, an encrypted second copy of my firmware sources and known-good binaries, and a secrets inventory that lists names only, never values.
The recovery plan is written as dependency-ordered scenarios (power, network, Home Assistant, integrations, Nodes, the touchscreen, then presence), ending with an honest list of gaps. And one rule I’d pass on to anyone: GitHub is not the Vault. A copy of the repository isn’t a backup of the running house.
JRHome Development: how changes get proven first

Development is the newest name in JRHome. The practices it names are already how every change gets made, and the dedicated bench is starting to exist:
- A prototype with swappable data sources (mock, a replay of recorded read-only evidence, or live), so I can build and test the interface without touching the house.
- Headless test suites, plus a release pipeline that scans for leaked secrets and checks that every packaged asset is actually in the package.
- Read-only discovery tools using temporary tokens kept outside the project and revoked afterward.
- For Satellites, a host test harness that emulates the display, touch, Wi-Fi and broker.
- The rule over all of it: a merge isn’t a deployment, and nothing counts as accepted until I’ve used it on the real hardware.
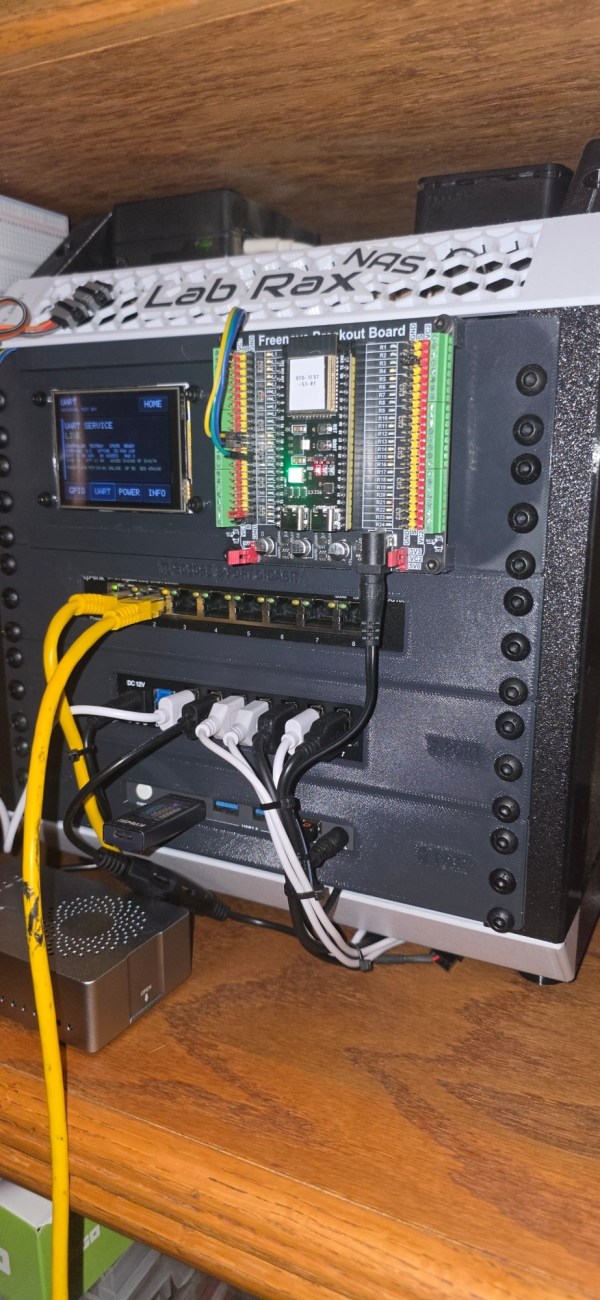
The physical side lives in my lab, JRHome Platform Development. The rack is built on Michael Klements’ open-source Lab Rax 10-inch server rack, which I printed from his model on MakerWorld, and the modular plates that hold the gear are my own designs, printed in PCTG: a network switch, a KVM, a USB hub and a display, with a quiet 120 mm fan for airflow. The name fits better than it first looks, since network-attached storage is a fair description of what the Vault does for the platform. An NVMe cloner sits beside the rack for duplicating and preparing drives during migrations and recoveries.
Its centerpiece is the Universal Test Bay: a permanent ESP32 supervisor, a small touchscreen that shows whether a board under test is online and talking over serial, and a breakout area where boards come and go. The point is a boundary between experimenting and production. A failed firmware experiment should never become a failed household lighting system.
It has already caught a real problem. Two ESP32-S3 boards went through the bench checks, and an older ESP32 Arduino core turned out to run their PSRAM unreliably, while a newer one passed 91 runs cleanly. That became a standing rule for every later S3 project.
What doesn’t exist yet is a dedicated staging copy of Home Assistant. For now, “staging” means the prototype, the test suites and the test bay, not a second house.
Put the two together and you get the shape of the platform: Development builds and proves it, the Vault preserves and protects it, and production runs it. That’s the design intent, and the full automated pipeline for every kind of device is still being built.
JRHome Christmas

Every platform needs one project that is a little more fun than the rest, and mine is the Christmas Node. It is a fused, fan-cooled control box with a WLED controller driving 500 addressable 24-volt pixels, five strings of 100, wired into Home Assistant like any other Node.
It holds 40 looks, 34 presets and 6 playlists, from traditional warm white to a nearly five-minute playlist called Griswold’s Greatest Hits. A schedule in Home Assistant runs the lights from sunset to midnight and again in the early morning, and JRHome Control gets a Holiday page that appears under Exterior during the season.
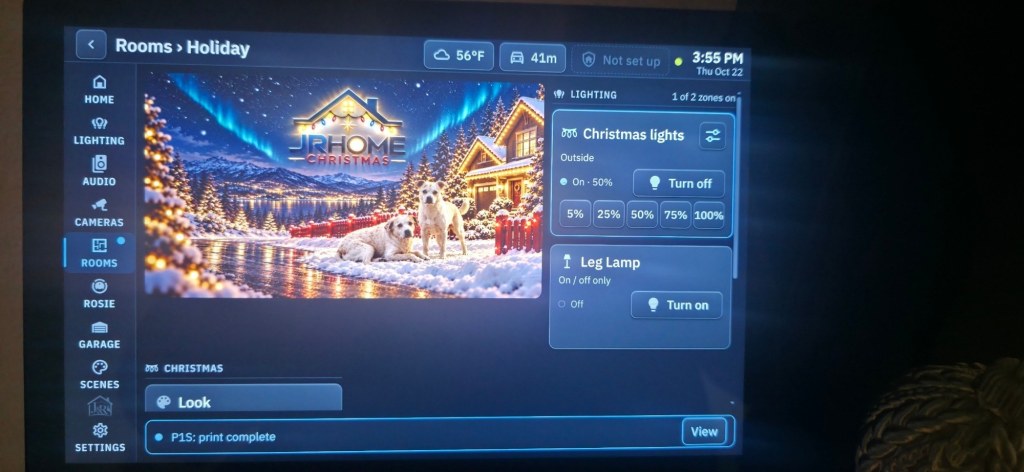
The lesson of this build came from a meter. Two strings at full white dropped the far-end voltage from about 24 volts to 17.7, and five strings starved down to roughly 7.5, so the plan became power injection at each string instead of hoping a long run would behave.
The Node is built, powered and integrated on the bench. The outdoor install, with its final measurements, is still ahead, and a full deep dive on the build is on its way.
What I’d Do Differently
- Start on durable storage. NVMe was always the plan for Core. I should have put production there before the SD path got a vote.
- Pick the off-device backup destination on Day 1, and test a restore before you need one.
- Compute pixel density before choosing pixel dimensions.
- Read the real device’s API before designing its controls. The garage would have been simpler from the start.
- Inventory what exists before designing around it. My records said one thing; the live system said another.
- Enforce rules in the layer that acts, not just the layer that draws the button. A greyed-out button isn’t a guard.
- Write the layout audit alongside the first render. Eyeballing screenshots can’t cover hundreds of combinations.
- Prove every test can fail. A suite that passes the first time hasn’t shown it can catch anything.
Where JRHome Stands Now
Core runs on NVMe and came back from a real backup restore. I walked the whole panel afterward to confirm it: garage control, the cameras, lighting, the thermostat, the printer, Rosie, weather, and the Bathroom Health Satellite — fully operational, all three panels live — all check out and work as intended. Traffic is back, and audio now works within the limits above. The 5-inch Elecrow Satellite is in use every day, the Craft Cove and Utility Satellites have joined it, and the Craft Cove custom lighting nodes are integrated and running alongside them.
The garage controller is in service. The bench node is still built but not integrated, and garage position sensing is planned, which is why the panel still says it doesn’t know. A few things are deliberately parked, like some front-yard landscape lights and a set of motion sensors. The large common-area display is a future project. The Vault is active and pulling backups, with its final sign-off waiting on a secondary drive and the final NVMe, the Development rack is built and in use, and the first Christmas lighting Node is waiting for its outdoor install.
What Comes Next
No dates promised, but the next steps are clear:
- Build the next Satellite from the shared runtime.
- Bring the bench node onto Core — an ESPHome re-flash, or its existing API.
- Finish the Vault’s expansion (secondary storage and the final NVMe) and sign it off, and get the Christmas node installed outdoors.
- Eventually: the 18.5-inch common-area display and an outdoor-kitchen controller.
This article is the overview. The subsystems are getting their own Practical Project Guide deep dives, with the build detail this page doesn’t have room for:
- Adding a 3D printer to a home touchscreen without inventing data
- Commissioning an Elecrow 5-inch ESP32-S3 panel with ESPHome and LVGL (and the touch-reset fix)
- Garage control that never lies about the door
- Ring live video on a Raspberry Pi kiosk through Home Assistant
- Designing a home touchscreen like a product
- A room Satellite that refuses to show stale data
- Backups, known-good releases and the day Core’s SD boot path failed
- Migrating an Arduino bench node to ESPHome
- Building a Christmas lighting node: 24 volts, 500 pixels and a lot of measuring
- Re-purposing a reader board as a WLED office sign


Leave a Reply